OIDC Identity Server
What is OIDC?
OIDC (OpenID Connect) is a modern identity authentication standard built on top of OAuth 2.0.
Core Concepts
- Identity layer: adds user authentication on top of OAuth 2.0 authorization
- Standard protocol: widely adopted, supports SSO
- User info access: in addition to tokens, user identity claims are available
- Strong security: identity information is carried with JWT (JSON Web Token)
OIDC capability in Next Terminal
Next Terminal includes a full OIDC Server implementation and can act as an Identity Provider for third-party applications.
Use cases:
- Unified login entry for multiple internal systems
- Centralized user/account management
- Simpler third-party authentication integration
- Cross-system SSO
Configuration Steps
1. Enable OIDC Server
In Next Terminal:
- Go to System Settings -> Identity Service
- Find OIDC Server
- Set Issuer URL to:
https://{host}/api- Replace
{host}with your Next Terminal address - Example:
https://nt.example.com/api
- Replace
- Save
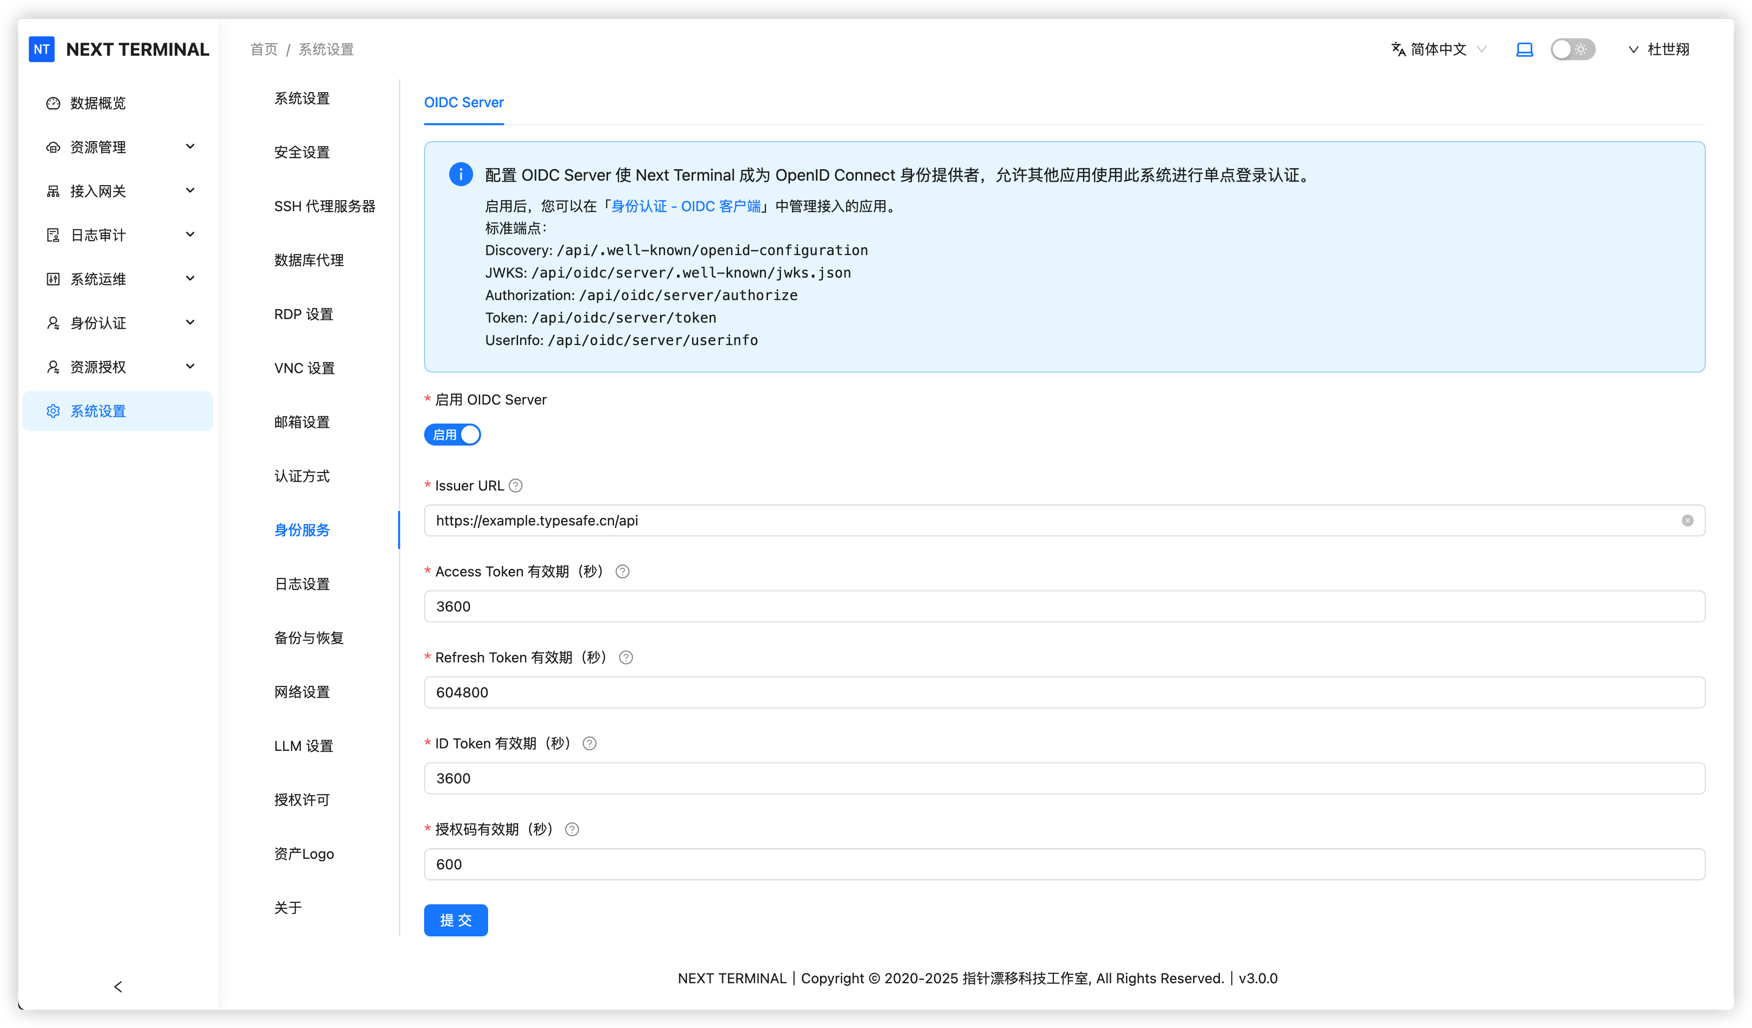
💡 Tip: Issuer URL is the unique identifier of your OIDC service. Third-party apps use it for discovery.
2. Create OIDC client
Create an independent OIDC client for each application:
- Go to OIDC Client Management
- Click Add Client
- Fill client information:
- Name: display name (Chinese is allowed)
- Client ID: unique client identifier
- must be unique and English-friendly
- recommended format: lowercase + hyphen, for example
pika-monitor
- Save, then system generates Client Secret
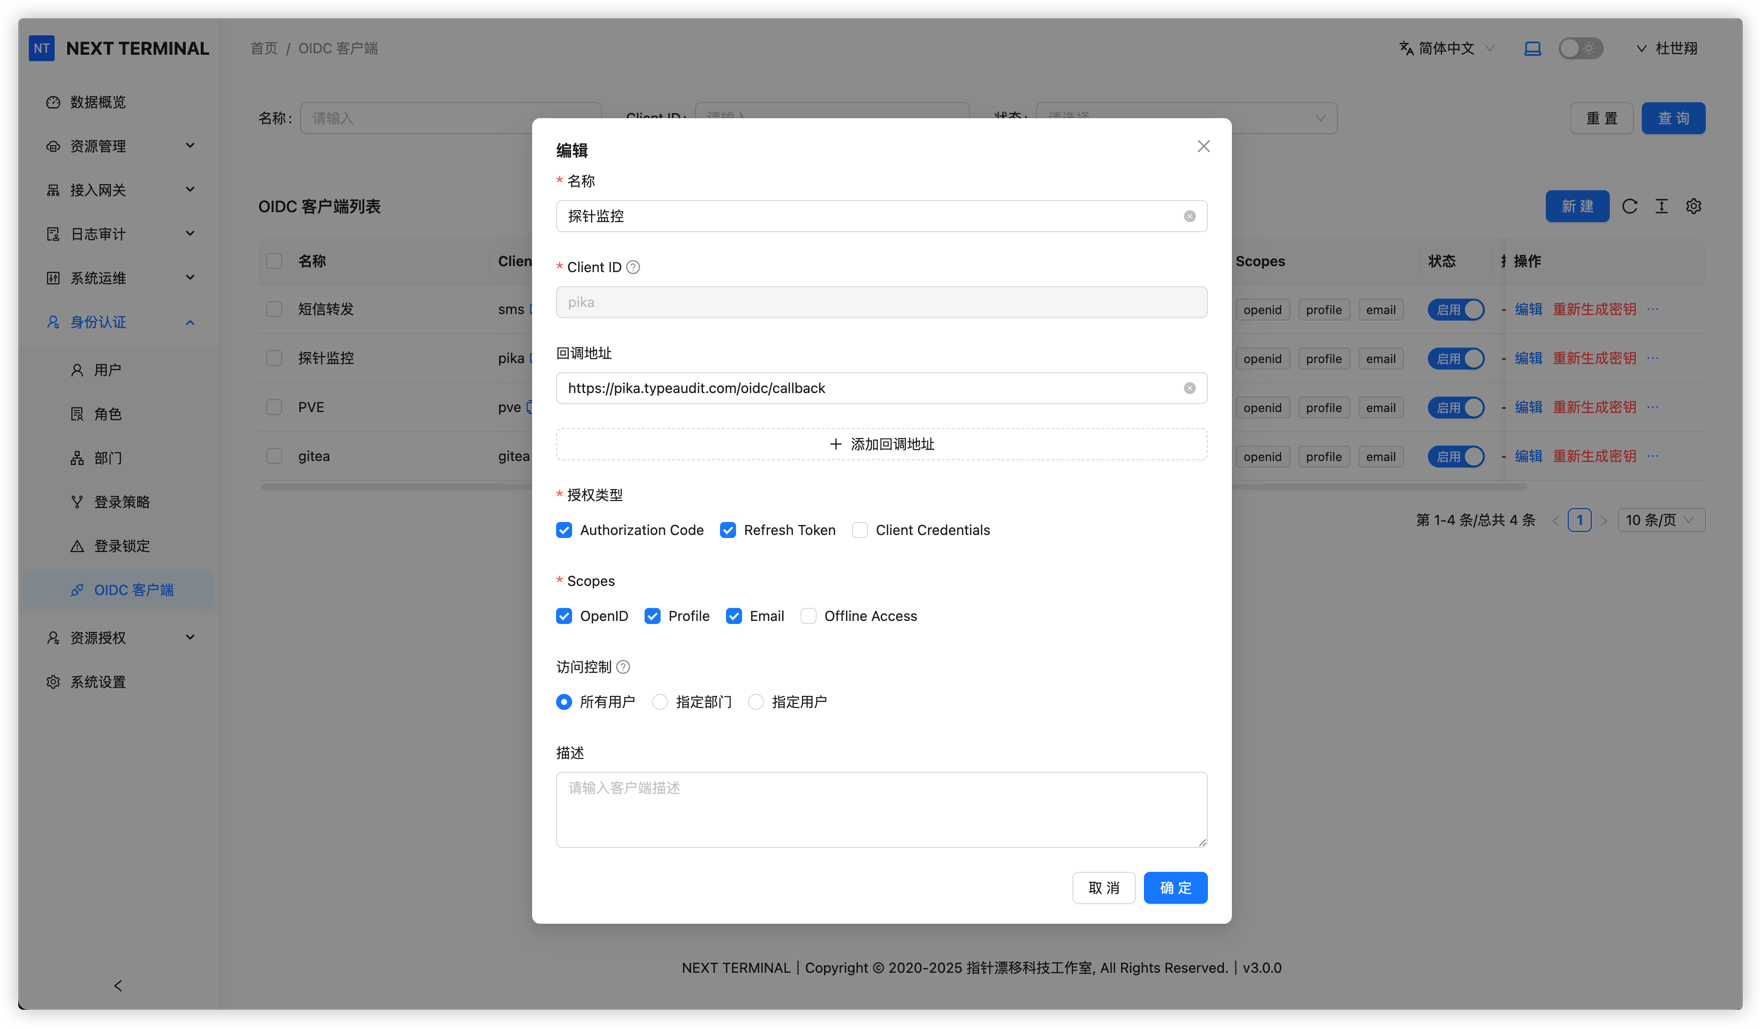
⚠️ Important: Client Secret is shown only once at creation. Save it securely.
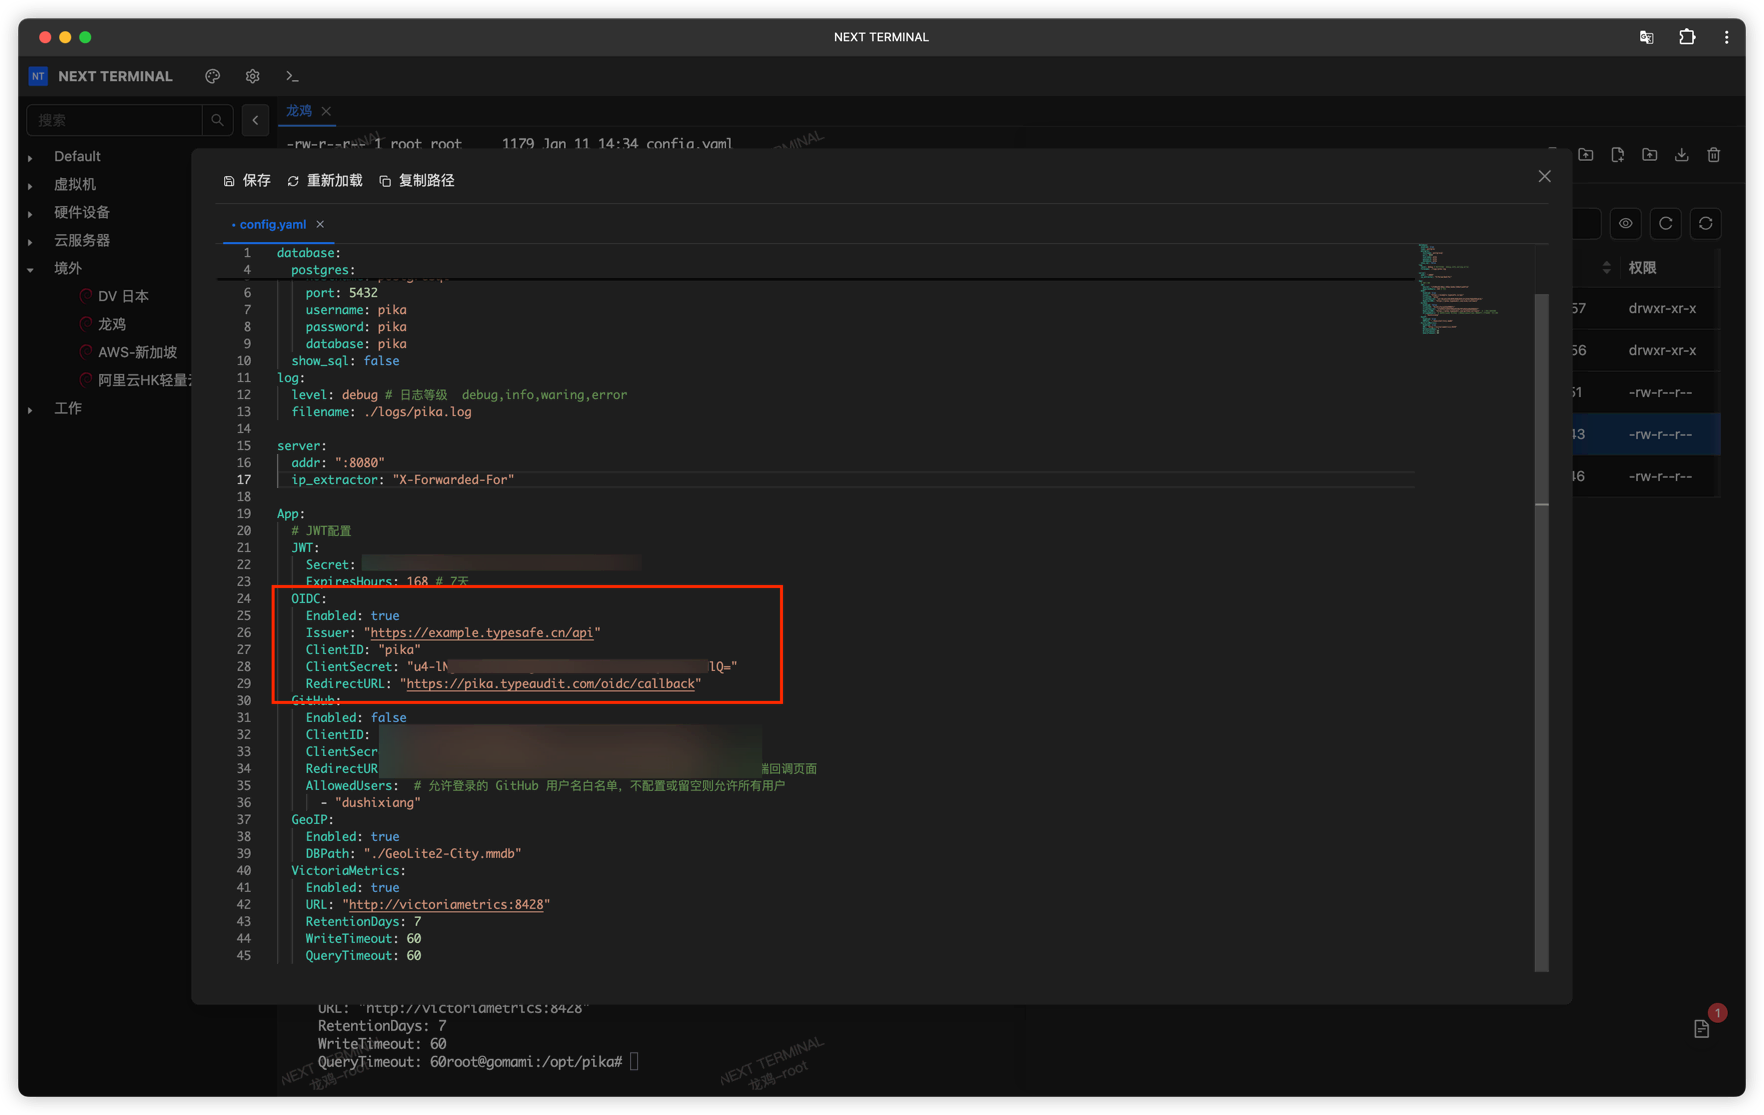
3. Configure third-party app
Configure your application to use Next Terminal OIDC service.
Example: Pika Monitor
Using Pika Monitor:
- Enable OIDC in application config
- Fill OIDC settings:
- Client ID: from Next Terminal
- Client Secret: from Next Terminal
- Issuer URL:
https://{host}/api - Redirect URI: according to app requirements
- Save and restart app
Login Flow
When user visits an OIDC-enabled app:
- Auth request: app redirects user to Next Terminal login page
- User login: user signs in via password/OTP/Passkey
- Authorization consent: user grants identity access to app
- Redirect back: Next Terminal redirects user with authorization code
- Token exchange: app exchanges code for access token
- User info fetch: app requests user claims with token
- Login completed: app creates session
User Claims Mapping
Next Terminal OIDC Server returns claims such as:
sub: unique user identifier (User ID)name: display namepreferred_username: usernameemail: user email (if configured)email_verified: whether email is verified
Security Recommendations
1. Use HTTPS
⚠️ HTTPS is mandatory for OIDC to protect tokens and user claims.
2. Protect Client Secret
- Never expose Client Secret in frontend code or public repositories
- Rotate Client Secret regularly
- Use different clients for different apps
3. Restrict Redirect URI
- Configure strict Redirect URI allowlist per client
- Avoid overly broad wildcard patterns
4. Audit logs
- Review OIDC login logs regularly
- Monitor suspicious sign-in behavior
- Revoke suspicious clients promptly
FAQ
1. How can I verify OIDC setup quickly?
Open https://{host}/api/.well-known/openid-configuration. If JSON is returned, discovery works and OIDC Server is enabled properly.
2. What if I forget Client Secret?
Client Secret is shown once at creation. If lost, regenerate it from client management.
3. Which authentication methods are supported?
Next Terminal OIDC Server supports:
- Username/password
- OTP
- Passkey
- Multi-factor authentication
4. Which apps can integrate?
Any standards-compliant OIDC client application, including:
- Grafana
- Harbor
- MinIO
- GitLab
- Nextcloud
- Custom applications
Related Docs
Common Configuration Parameters
Most OIDC-enabled apps need these parameters:
| Parameter | Value | Description |
|---|---|---|
| Issuer / Discovery URL | https://{host}/api | OIDC discovery address |
| Client ID | Get from NT | Unique client ID |
| Client Secret | Get from NT | Client secret |
| Authorization Endpoint | https://{host}/api/oauth2/authorize | Authorization endpoint (usually auto-discovered) |
| Token Endpoint | https://{host}/api/oauth2/token | Token endpoint (usually auto-discovered) |
| UserInfo Endpoint | https://{host}/api/oauth2/userinfo | User info endpoint (usually auto-discovered) |
| Redirect URI | Application-defined | Callback URL after successful authentication |
💡 Tip: Most OIDC clients support Discovery. In many cases, only Issuer URL is needed.