Web Assets
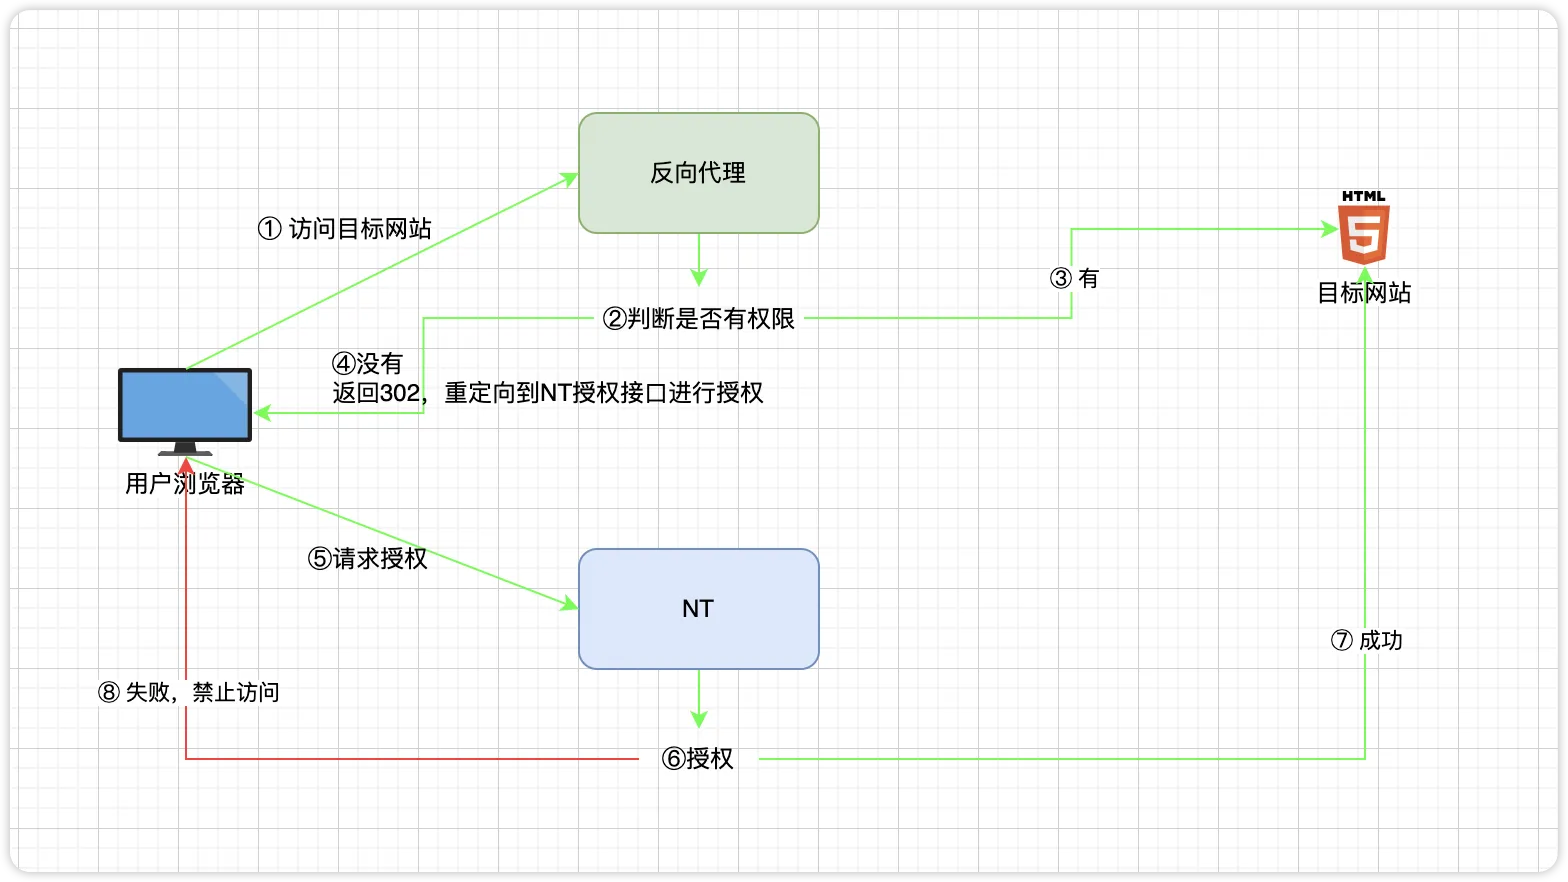
A Web Asset attaches an internal or restricted website to NextTerminal. Instead of hitting the target website directly, users go to NextTerminal's reverse proxy entry point. NextTerminal performs login and authorization checks, then forwards the request to the real site.
Typical flow:
User browser
  → opens https://gitlab.example.com
  → DNS points to the NextTerminal server
  → NextTerminal verifies login and Web asset authorization
  → forwards to internal site http://192.168.1.10:80
Two Addresses People Confuse
| Name | Example | Meaning |
|---|---|---|
| Web asset domain | gitlab.example.com | The domain users type in the browser. Must resolve to the NextTerminal server, not the internal site itself. |
| Asset address (Asset IP + port) | 192.168.1.10:80 | The address NextTerminal actually forwards to on the backend. |
WARNING
The "Domain" field on a Web asset is the reverse proxy entry domain — not the internal site's real address. This is the single most common mistake when creating a Web asset.
Built-in Reverse Proxy vs External Reverse Proxy
In this guide, "reverse proxy" refers to NextTerminal's built-in Web asset reverse proxy — it accepts requests for gitlab.example.com, wiki.example.com, etc., and forwards them to the corresponding internal site.
That is not the same thing as an external reverse proxy like Nginx, a CDN, or a load balancer:
| Type | Path | Purpose |
|---|---|---|
| Built-in reverse proxy | User → NextTerminal → Internal site | Web asset access control |
| External reverse proxy | User → Nginx / CDN / Load balancer → NextTerminal | Unified entry point, TLS termination, load balancing for NextTerminal itself |
If your path is just User → NextTerminal → Internal site, the configuration in this guide is enough.
If it is User → Nginx / CDN / Load balancer → NextTerminal → Internal site, also read Get the Real Client IP, or access logs and IP-based controls will show the wrong IP.
When to Use Web Assets
Restrict access to a public-IP website
Your site has a public IP but should not be open to everyone. Configure the target site to only allow the NextTerminal server's IP, then attach it as a Web asset. Users must log into NextTerminal and have authorization before they can reach it.
Unified access across multiple clouds or networks
Internal sites are scattered across multiple clouds, regions, or isolated networks. Deploy a Security Gateway in each network and register them with NextTerminal. When creating a Web asset, pick the matching gateway — every internal site becomes reachable from a single entry.
Access services in isolated zones
In government clouds, dedicated networks, or air-gapped zones, internal servers can't be exposed to the public internet. Deploy a Security Gateway on a jump host that can reach the internal site, and use NextTerminal as the unified entry point for SSH/Web access with full auditing.
Prerequisites
- NextTerminal is deployed and the admin UI is reachable.
- You own a domain whose DNS records you can edit.
- The target website is up and running.
- The NextTerminal server (or the Security Gateway you'll select) can reach the target website.
- Port
80and/or443on the NextTerminal server is reachable by users.
Video Tutorial
5-Minute Minimal Working Example
This walkthrough exposes an internal GitLab through gitlab.example.com. Once finished, opening https://gitlab.example.com will require a NextTerminal login before reaching GitLab.
Example Environment
| Item | Value |
|---|---|
| NextTerminal server public IP | 1.2.3.4 |
| NextTerminal admin domain | nt.example.com |
| Web asset domain | gitlab.example.com |
| Internal GitLab address | http://192.168.1.10:80 |
1. Configure DNS
Add the following records at your DNS provider:
| Host | Type | Value |
|---|---|---|
nt | A | 1.2.3.4 |
gitlab | A | 1.2.3.4 |
So that:
nt.example.com      → 1.2.3.4
gitlab.example.com  → 1.2.3.4
Wildcard DNS
For many Web assets, set a wildcard record like *.example.com → 1.2.3.4. New assets such as wiki.example.com or jenkins.example.com will work without any further DNS change.
2. Enable the Reverse Proxy in config.yaml
Open config.yaml and add or edit ReverseProxy under App:
App:
  ReverseProxy:
    Enabled: true
    HttpEnabled: true
    HttpAddr: ":80"
    HttpRedirectToHttps: true
    HttpsEnabled: true
    HttpsAddr: ":443"
    SelfProxyEnabled: true
    SelfDomain: "nt.example.com"
    Root: ""
    IpExtractor: "direct"
    IpTrustList: []
Field reference:
| Field | Example | Meaning |
|---|---|---|
Enabled | true | Enable the Web asset reverse proxy |
HttpEnabled | true | Enable the HTTP listener |
HttpAddr | ":80" | HTTP listen address |
HttpRedirectToHttps | true | Force HTTP requests to redirect to HTTPS |
HttpsEnabled | true | Enable the HTTPS listener |
HttpsAddr | ":443" | HTTPS listen address |
SelfProxyEnabled | true | Serve the NextTerminal admin UI through the reverse proxy domain too |
SelfDomain | nt.example.com | NextTerminal admin domain |
Root | "" | Leave empty when SelfProxyEnabled: true |
IpExtractor | direct | Default; see Get the Real Client IP |
IpTrustList | [] | Empty means use the built-in private-range trust list |
Real client IP
If NextTerminal sits behind Nginx, a CDN, a WAF, or a load balancer, direct will record the proxy IP in your access logs. See Get the Real Client IP for the correct values.
3. Configure the HTTPS Certificate
With HttpsEnabled: true, the built-in reverse proxy needs a certificate to terminate https://gitlab.example.com and https://nt.example.com. Certificates are managed in the admin UI:
Go to Certificate Management → New Certificate. Three certificate types are supported:
- Self-signed: for internal testing only; browsers will show a warning.
- Imported: upload a PEM certificate and private key you already have.
- Auto-issued (ACME): request and renew automatically via Let's Encrypt or a similar ACME provider.
The Common Name (CN) must cover both nt.example.com and gitlab.example.com, or use a wildcard certificate such as *.example.com.
4. Map Ports 80 / 443
When deploying with Docker Compose, map the reverse proxy ports in docker-compose.yml:
services:
  next-terminal:
    ports:
      - "8088:8088" # NextTerminal admin UI
      - "2022:2022" # SSH Server (optional)
      - "80:80"     # Web asset HTTP reverse proxy
      - "443:443"   # Web asset HTTPS reverse proxy
Restart:
docker compose down
docker compose up -d
5. Add a Web Asset
In the admin UI, create a new Web asset.
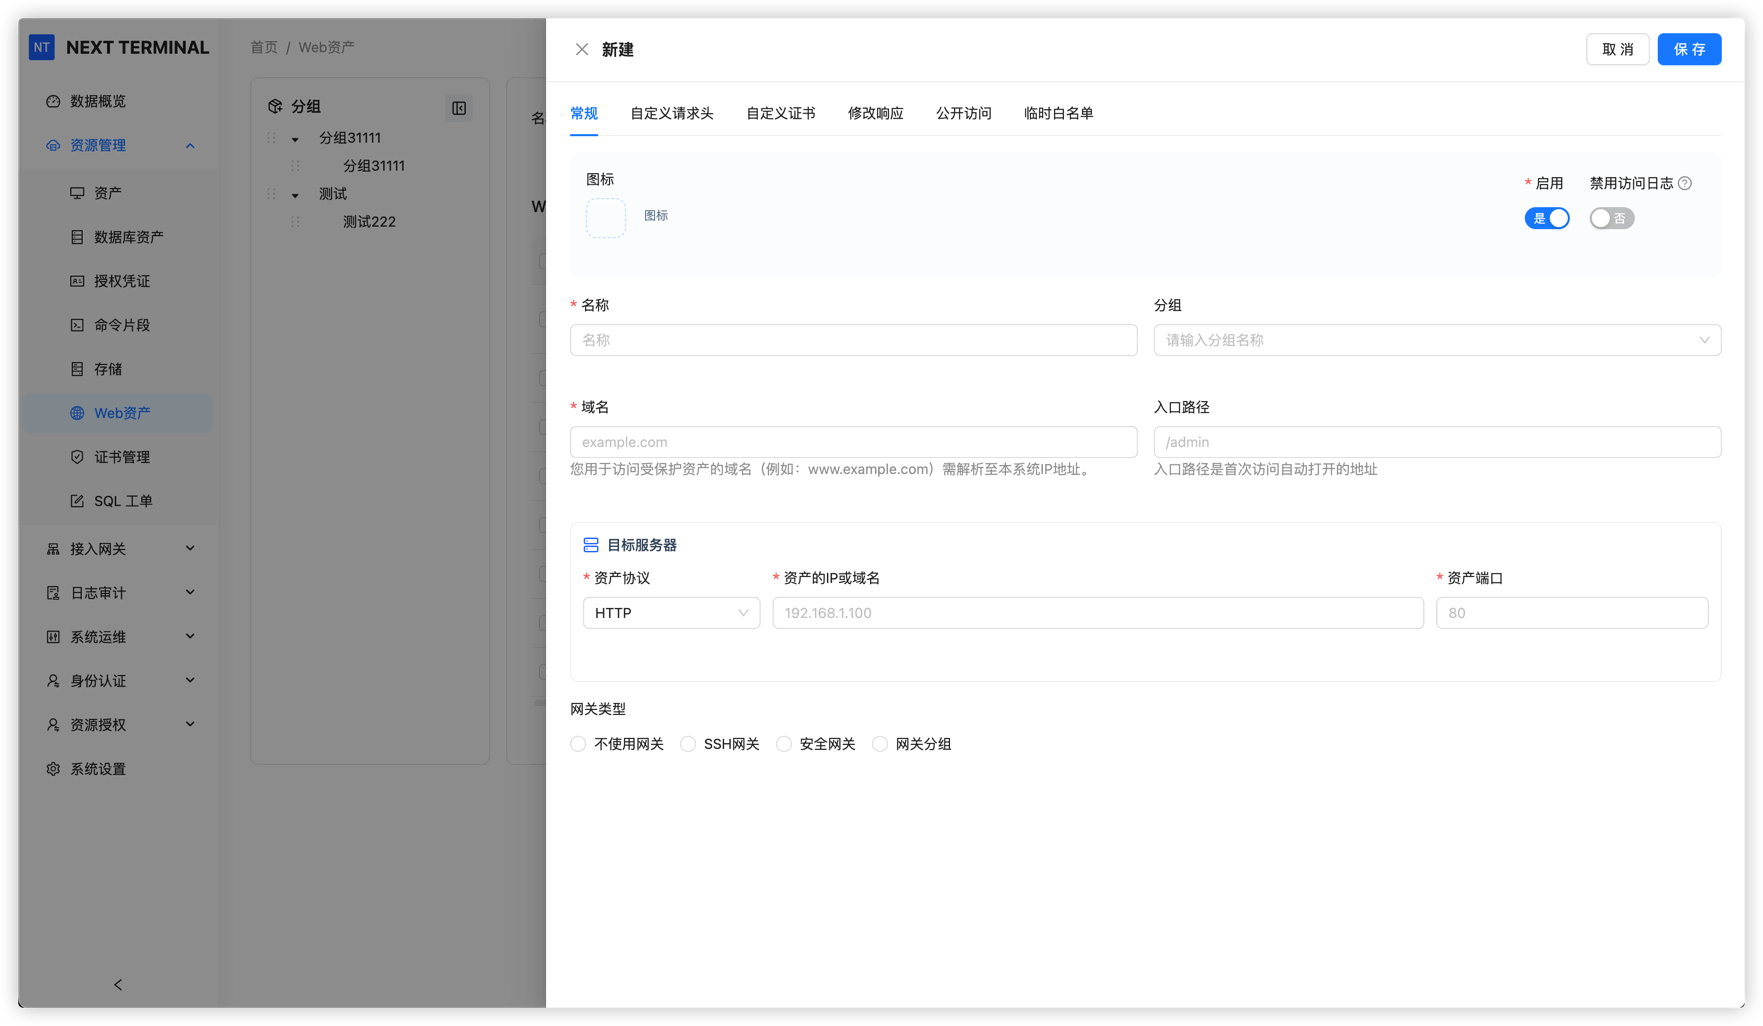
Fill in:
| Field | Example | Notes |
|---|---|---|
| Name | Internal GitLab | Display name |
| Domain | gitlab.example.com | The domain users type; must resolve to the NextTerminal server |
| Entry Path | / | Default path, usually / or empty |
| Protocol | HTTP | Protocol of the internal site itself |
| Asset IP | 192.168.1.10 | Internal IP, or an internal hostname NextTerminal can resolve |
| Asset Port | 80 | Internal site port |
| Security Gateway | none | Only pick a gateway if NextTerminal can't reach the internal site directly |
WARNING
- The Web asset domain must be unique. It cannot collide with
SelfDomainor another Web asset. - For example,
nt.example.comis the admin domain andgitlab.example.comis the GitLab Web asset — don't swap them.
6. Authorize and Open
Grant access to the new Web asset for users or user groups.
After authorization, users open:
https://gitlab.example.comUnauthenticated users are redirected to the NextTerminal login page. After login and authorization checks, the request is forwarded to the internal GitLab.
SelfProxyEnabled, SelfDomain, and Root Explained
These three fields decide where unauthenticated users are redirected to log in when they hit a protected Web asset.
Recommended: SelfProxyEnabled = true
App:
  ReverseProxy:
    SelfProxyEnabled: true
    SelfDomain: "nt.example.com"
    Root: ""
The NextTerminal admin UI is served through the built-in reverse proxy too. Unauthenticated Web asset visitors are redirected to https://nt.example.com to sign in.
Best for:
- You already have a domain for NextTerminal.
- You want the admin UI and Web assets to share a unified domain entry.
- You want a clean, consistent login redirect flow.
Real IP note
With SelfProxyEnabled: true, admin UI requests pass through the built-in reverse proxy before reaching the admin handler. If the admin login log or audit shows 127.0.0.1 or a container gateway address, see Get the Real Client IP — Scenario 2.
Alternative: SelfProxyEnabled = false
App:
  ReverseProxy:
    SelfProxyEnabled: false
    SelfDomain: ""
    Root: "https://1.2.3.4:8088"
The admin UI keeps using the address from Root. Unauthenticated Web asset visitors are redirected there to sign in.
Best for:
- No domain assigned to NextTerminal yet.
- You still want to access the admin UI via IP:port.
Use a Security Gateway for Internal Sites
When the NextTerminal server itself can't reach the target website (different cloud, different region, isolated network), use a Security Gateway.
Path:
User browser
  → NextTerminal
  → Security Gateway
  → Internal site
Steps:
- Deploy a Security Gateway in a network that can reach the internal site.
- Make sure the gateway is registered with NextTerminal and online.
- When creating the Web asset, pick that gateway in the Security Gateway field.
- Fill in Asset IP and Asset Port with the internal address that's reachable from the gateway's network.
For example, an internal site only reachable via the gateway at 10.10.0.20:8080:
| Field | Value |
|---|---|
| Protocol | HTTP |
| Asset IP | 10.10.0.20 |
| Asset Port | 8080 |
| Security Gateway | the matching gateway |
Advanced Features
Modify Response
Some sites hard-code their original domain, IP, or paths in HTML, API responses, or redirects. Going through a reverse proxy then breaks styles, breaks API calls, or redirects the user to an internal address.
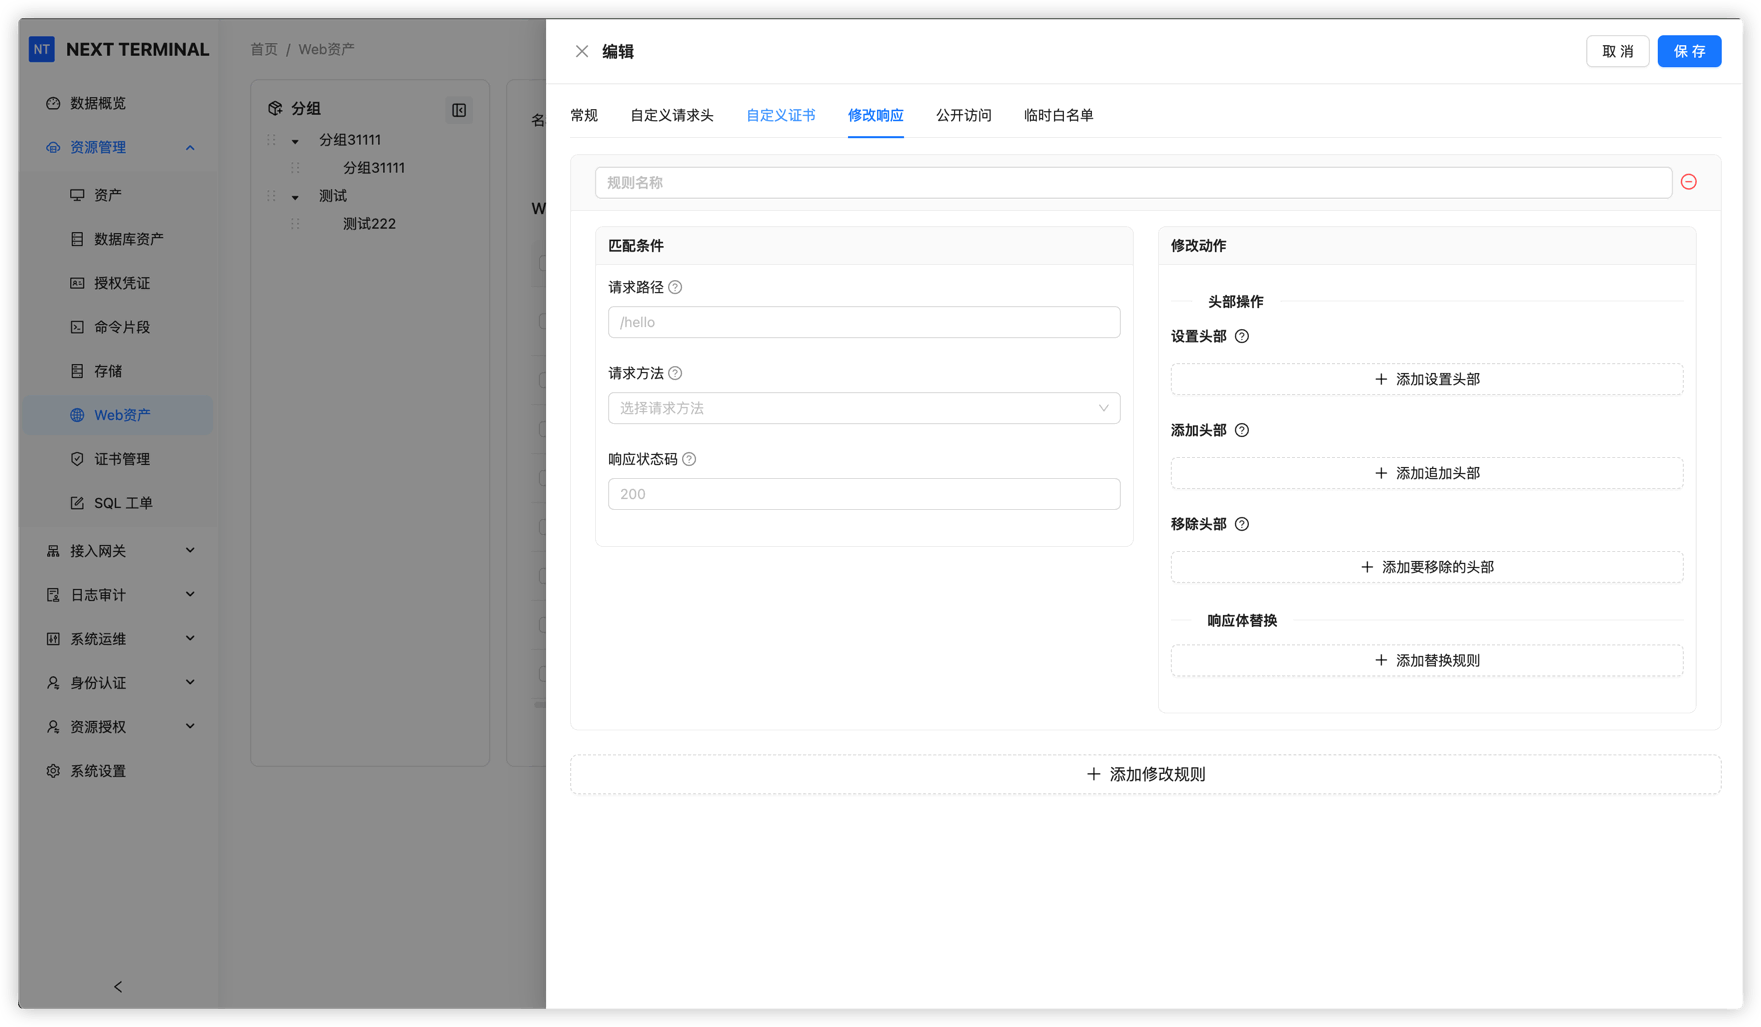
Common uses:
- Replace
http://192.168.1.10withhttps://gitlab.example.comin pages. - Replace internal hostnames with the Web asset domain in API responses.
- Fix hard-coded redirect locations.
Public Access Policy
For Web assets that genuinely need public access but shouldn't be wide open, the Public Access policy combines IP, geolocation, and passphrase rules to limit reach.
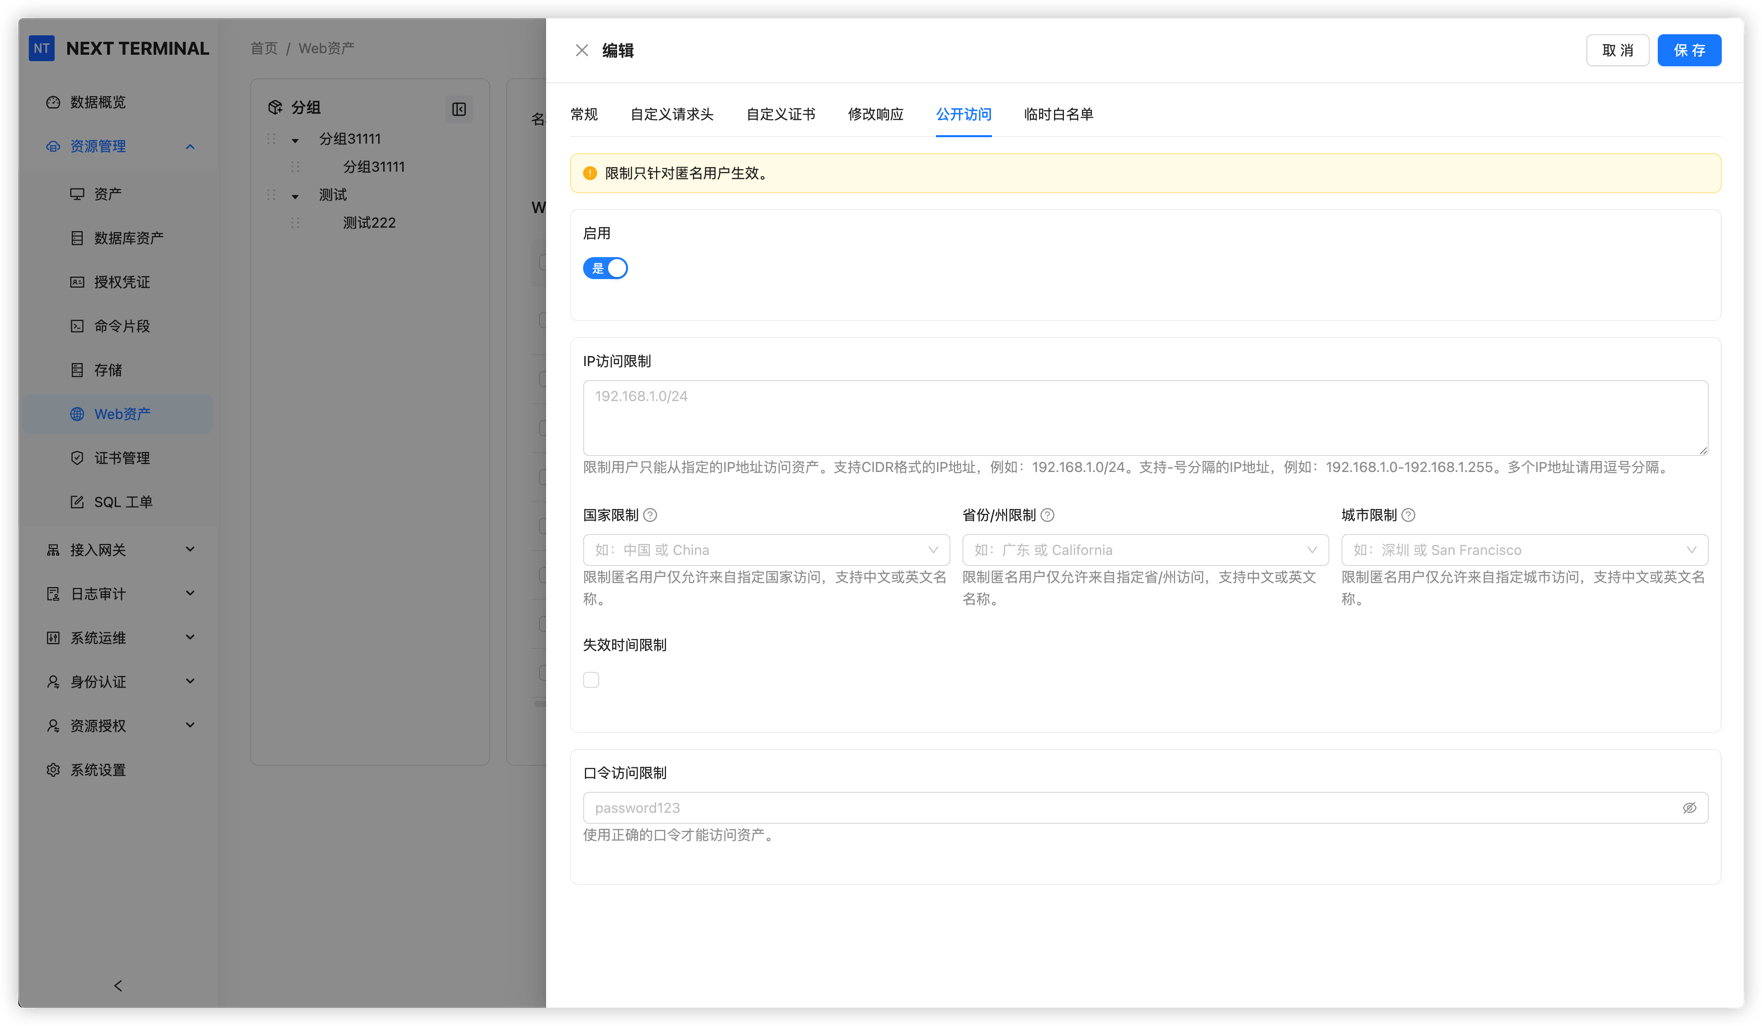
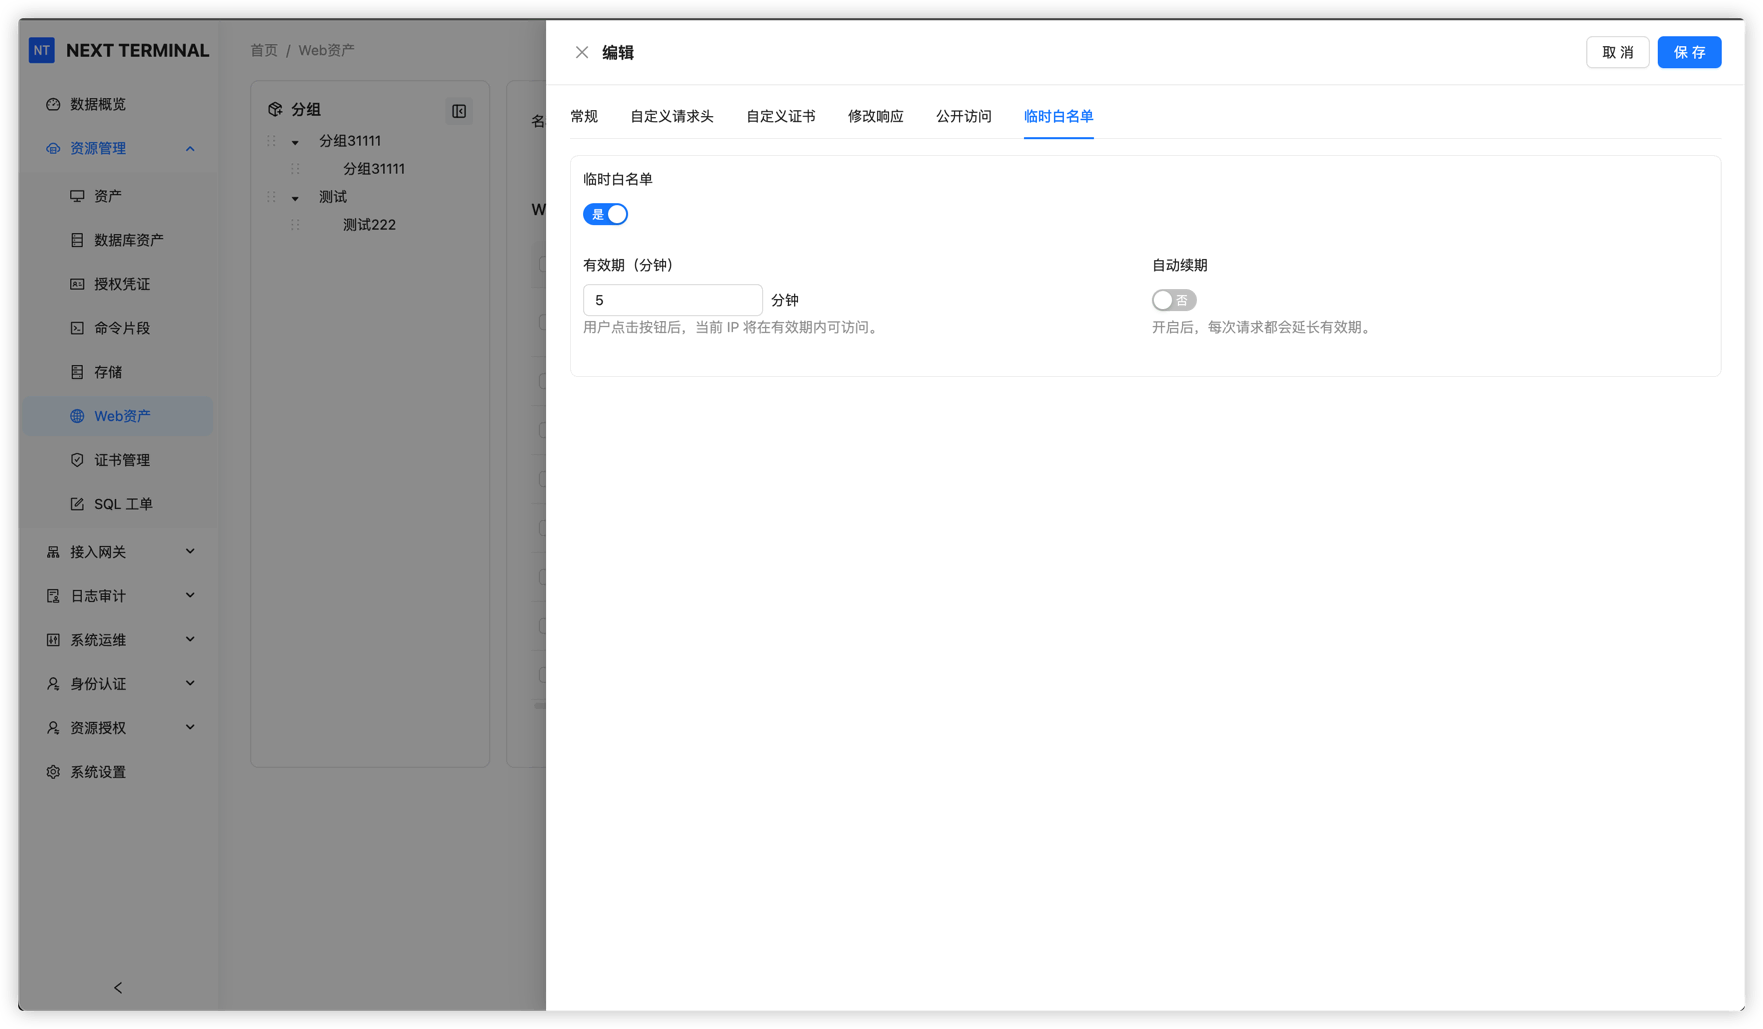
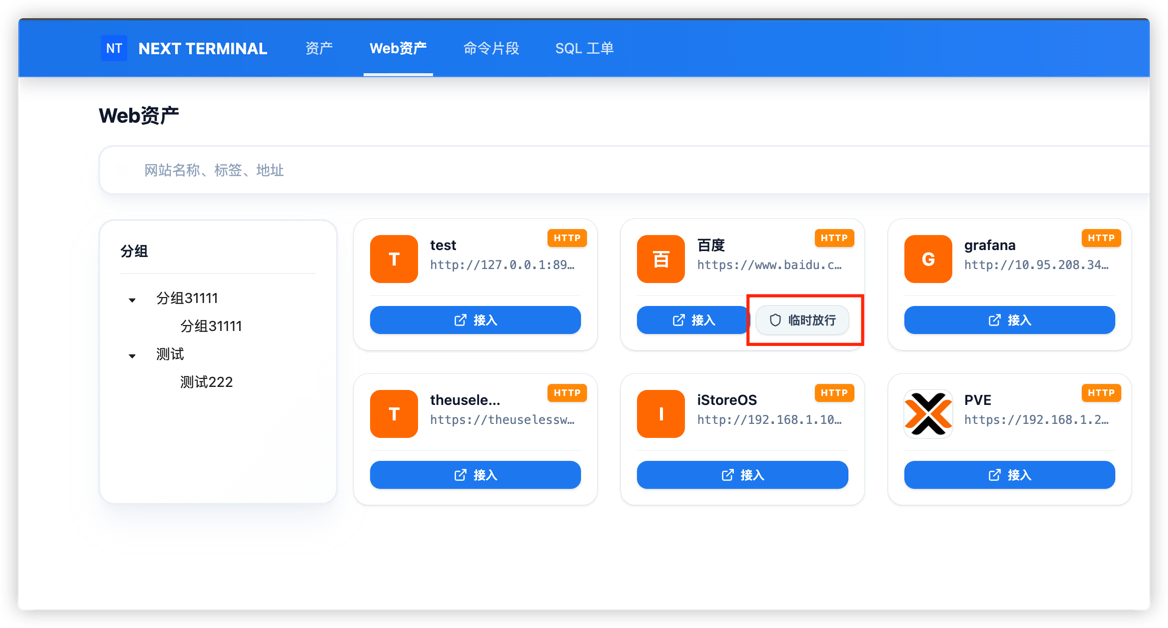
Temporary Allowlist
For users without a fixed IP, the Temporary Allowlist exposes a one-click link from the Web asset's Public Access page. Clicking it adds the user's current IP to the allowlist, the entry expires automatically, and continued use extends its validity.
FAQ
The Web asset domain doesn't respond at all
Check, in order:
- The Web asset domain resolves to the NextTerminal server's public IP.
- The server's security group / firewall allows
80/443. - Docker Compose maps
80:80and443:443. ReverseProxy.Enabledistrueinconfig.yaml.HttpEnabledorHttpsEnabledis on.- NextTerminal was restarted after editing
config.yaml.
I land on the wrong site
Usually a domain or DNS mistake:
SelfDomainis for the admin UI only (e.g.nt.example.com).- A Web asset domain is for that specific asset (e.g.
gitlab.example.com). - The Web asset domain must not collide with
SelfDomain. - Two Web assets can't share the same domain.
Browser shows a certificate warning
Make sure Certificate Management has a certificate that covers the Web asset domain. Self-signed certificates always trigger warnings — use Let's Encrypt or a real CA in production.
"Permission denied" after login
Make sure the user or group is authorized to access this Web asset.
The page loads but styles, APIs, or redirects break
The target site likely hard-codes internal addresses or absolute URLs. Check failing requests in browser DevTools, then use Modify Response to rewrite the offending content.
NextTerminal can't reach the internal site
Confirm the NextTerminal server can hit the target IP and port (e.g. curl http://192.168.1.10:80). If not, deploy and select a Security Gateway.
Wrong client IP in Web asset access logs
If anything (Nginx, CDN, WAF, load balancer) sits in front of NextTerminal, configure IpExtractor and IpTrustList in config.yaml according to Get the Real Client IP.
Wrong IP in admin login logs
Admin client IP is not configured in config.yaml. Configure it under System Settings → Network Settings. See Get the Real Client IP.