Stop Exposing Internal Services Directly: A Safer and Cleaner Approach
1. Current Situation: Are your internal services exposed to the internet?
If you run a few cloud servers or a home NAS, you've probably tried intranet tunneling. But when you check auth.log or SSH logs, you quickly see constant malicious traffic:
- Forwarding port 22 with frp: thousands of brute-force attempts appear within minutes.
- Directly exposed web services: one unauthenticated vulnerability in GitLab/Jenkins can lead to full compromise.
- VPN operational overhead: WireGuard is fast, but account provisioning and client setup for non-technical users is a long-term burden.
What we really need is simple: frp-level convenience + VPN-level security + browser-native experience.
2. Why traditional approaches become painful
frp: connectivity, not security boundary
frp is designed for connectivity. It moves traffic from A to B.
- Risk: it pushes internal services directly to public attack surface. Port changes and
skcan reduce noise, but do not solve identity authentication and auditing. - Reality: even non-default ports can still be identified by protocol fingerprinting.
VPN: secure, but high friction
VPN is a strong wall, but entry/exit is operationally expensive.
- Experience: every phone/tablet/desktop needs a client. Reconnection and route conflicts are common.
- Risk model: often all-or-nothing network access. Once credentials leak, attackers may obtain broad internal access.
3. A modern approach: zero-trust style access with Next Terminal
When designing Next Terminal Web Asset proxying, we followed a zero-trust principle:
Verify identity first, then establish access.
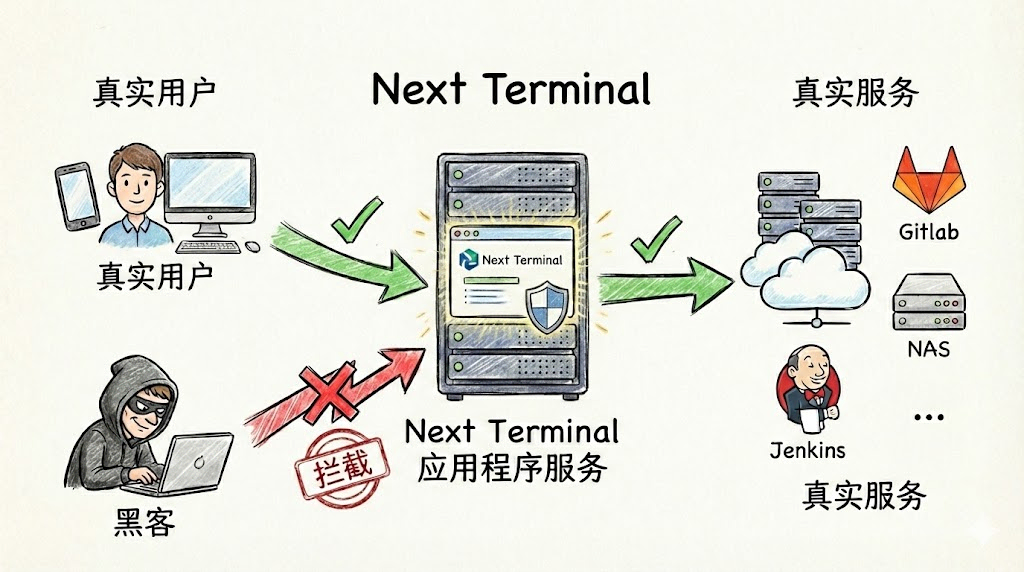
How it works
Before: requests to gitlab.example.com go directly to GitLab.
Now: Next Terminal acts as a security gateway:
- Traffic interception: all requests to internal web services go through Next Terminal first.
- Identity check: if user is not logged in, request is blocked before reaching GitLab.
- Dynamic authorization: after login, system checks whether this user is allowed to access this specific asset.
- Transparent forwarding: once verified, user reaches the original GitLab interface.
4. Practical setup: publish internal GitLab securely in 3 minutes
Assume internal GitLab is on 192.168.1.10:80.
Step 1: enable reverse proxy
Enable reverse proxy and HTTPS in Next Terminal config (wildcard certificate recommended):
App:
  ReverseProxy:
    Enabled: true
    HttpsEnabled: true
    SelfDomain: "nt.yourdomain.com"
Step 2: Add Web Asset
In Web UI, click Add Asset, fill internal IP and desired domain (for example gitlab.yourdomain.com).
Step 3: authorize and access
Grant this asset to target user groups.
Then user experience becomes:
- Visiting
https://gitlab.yourdomain.com - Not logged in? Redirect to NT unified login
- Logged in? Enter GitLab directly
- Need audit? Access records are available in audit logs
Online demo: https://baidu.typesafe.cn
(This demo simulates internal access flow. Login withtest/testand observe seamless redirection.)
5. Advanced: one unified gateway across multi-cloud and multi-site
If you manage multiple environments (different cloud vendors, office, home lab), traditional solutions require complex routing tunnels.
Next Terminal provides Security Gateway (Agent) mode:
- Deploy a lightweight agent in each internal network.
- Agent builds reverse tunnels back to the NT main site.
- When creating assets, select the corresponding gateway.
Result: regardless of service location, you get one unified entry point, without configuring router port mapping.
Summary
| Requirement | frp | VPN | Next Terminal |
|---|---|---|---|
| Access friction | Very low (port scan reachable) | High (client required) | Very low (browser only) |
| Security | Weak | Strong | Very strong (identity-first) |
| Permission control | None | Coarse-grained | Fine-grained (per-user/per-asset) |
| Ops cost | Fragmented | Complex | Unified console |
If you are tired of daily SSH brute-force logs and VPN support overhead, try Next Terminal.